A malfunctioning microphone can disrupt online meetings, gaming sessions, and recording projects. This guide provides nine practical steps to diagnose and resolve common microphone problems on your computer, covering both hardware and software solutions. Whether you’re experiencing crackling audio, low volume, or complete silence, we’ll guide you through a systematic troubleshooting process to get your microphone working optimally.
We’ll explore how to identify the root cause—hardware or software—and offer clear instructions for checking connections, updating drivers, adjusting settings in various applications (like Zoom and Discord), and utilizing advanced techniques to optimize audio quality. By the end, you’ll possess the skills to confidently tackle most microphone issues.
Identifying the Problem

Troubleshooting microphone issues requires a systematic approach to determine whether the problem lies with the microphone’s hardware or the computer’s software. Understanding this distinction is crucial for efficient problem-solving. Incorrectly identifying the source can lead to wasted time and effort.
Identifying whether the problem stems from hardware or software is the first critical step. Hardware issues involve physical components, while software issues relate to drivers, settings, and applications. A methodical approach, combining visual inspection with software checks, is most effective.
Hardware vs. Software Microphone Problems
Differentiating between hardware and software problems involves a series of checks. Begin with a visual inspection of the microphone and its connection. Then, proceed to software checks, focusing on driver updates and system settings. If the problem persists after these checks, the issue is likely hardware-related.
Common Hardware Microphone Issues
A malfunctioning microphone can stem from various hardware problems. These problems often manifest in distinct ways, helping in diagnosis.
| Issue | Cause | Symptom | Solution |
|---|---|---|---|
| Faulty Connection | Loose cable, damaged port, or incorrect connection. | No sound detected, intermittent sound, or static. | Check all connections, try different ports, and inspect the cable for damage. Replace faulty cables or ports as needed. |
| Driver Issues | Outdated, corrupted, or missing audio drivers. | Microphone not recognized, distorted sound, or no sound. | Update or reinstall audio drivers from the manufacturer’s website or Device Manager. |
| Damaged Microphone | Physical damage to the microphone element or internal components. | No sound, distorted sound, or low audio quality. | Test with a different microphone. If the problem persists, the issue is likely with the sound card or motherboard. If a different microphone works correctly, the original microphone needs replacement. |
| Internal Sound Card Malfunction | Failure of the integrated sound card or external sound card. | No sound from any audio device (speakers or microphone). | Test with external speakers and a different microphone. If the problem persists, the sound card might be faulty and needs repair or replacement. |
Troubleshooting Flowchart
The following flowchart illustrates a step-by-step approach to troubleshoot microphone problems:
(Imagine a flowchart here. It would start with a “Microphone Problem?” Yes/No decision point. A “Yes” branch would lead to “Check Physical Connections” (Yes/No), then “Check Device Manager/Drivers” (Yes/No). A “No” on either of these would lead to “Hardware Problem Likely.” A “Yes” on both would lead to “Check System Sound Settings” (Yes/No). A “No” here would lead to “Software Problem Likely.” A “Yes” on all checks would indicate a likely resolved problem.)
Checking Microphone Connections and Default Settings
Verifying the microphone’s connection and its status as the default input device is essential. First, visually inspect the microphone cable to ensure it is securely plugged into both the microphone and the computer’s audio input jack. Then, access your operating system’s sound settings (the exact path varies depending on the OS). Locate the “Recording” or “Input” tab, select your microphone from the list of available devices, and set it as the default. A test recording can confirm functionality.
Software and Driver Troubleshooting
Microphone problems often stem from software glitches or outdated drivers. Addressing these issues can resolve many audio difficulties without requiring extensive hardware checks. This section details troubleshooting steps for both software conflicts and driver updates on Windows and macOS systems.
Updating or Reinstalling Audio Drivers
Outdated or corrupted audio drivers are a frequent cause of microphone malfunctions. Updating or reinstalling them can often resolve connectivity, input level, or distortion problems. The process varies slightly between Windows and macOS.
- Windows:
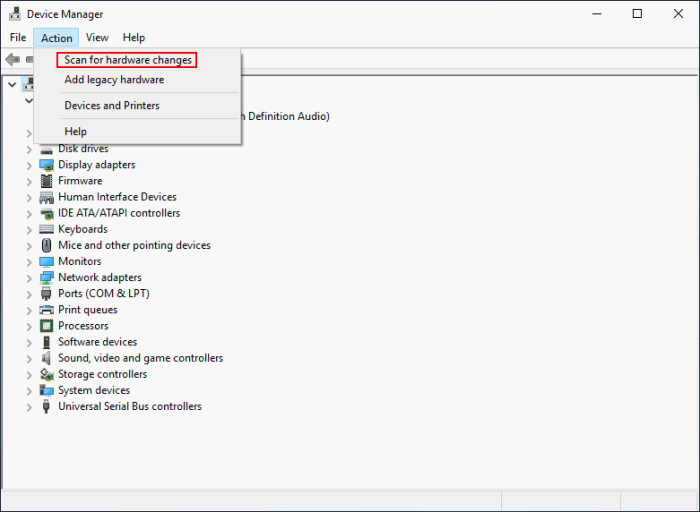
- Open Device Manager (search for it in the Windows search bar).
- Expand “Sound, video and game controllers”.
- Right-click on your audio device (likely named something like “High Definition Audio Device” or the manufacturer’s name and model).
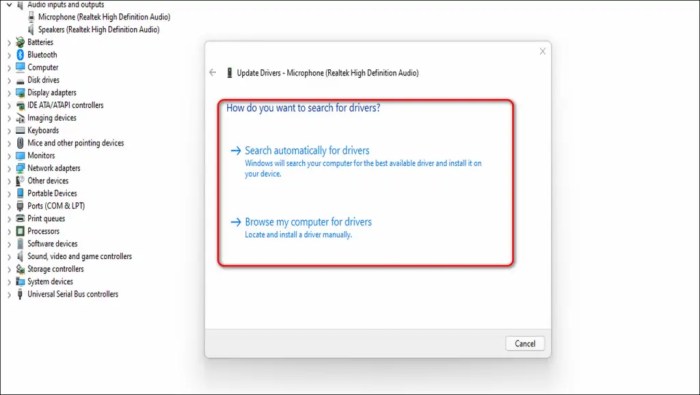
- Select “Update driver”.
- Choose “Search automatically for drivers”. Windows will search for and install the latest driver.
- If that doesn’t work, try “Browse my computer for drivers” and manually locate a downloaded driver file (if you have one).
- If problems persist, try uninstalling the driver (right-click, “Uninstall device”), restarting your computer, and letting Windows automatically reinstall it.
- macOS:
- Open System Preferences (found in the Apple menu).
- Click on “Sound”.
- Select the “Input” tab.
- Ensure your microphone is selected as the input device.
- macOS generally manages driver updates automatically through its software update mechanism. Check for updates in System Preferences > Software Update.
- If problems persist, restarting your computer may help. More drastic measures, such as reinstalling macOS (a last resort), might be necessary in extreme cases.
Software Conflicts
Certain software applications can interfere with microphone functionality, either by monopolizing audio resources or conflicting with driver settings. Examples include virtual audio cables, audio recording software, or even some gaming applications. These conflicts can manifest as no audio input, distorted sound, or intermittent microphone failures.
To resolve these conflicts, try closing unnecessary applications running in the background. Restarting your computer is another effective way to clear out potential software conflicts. If a specific application seems to be the culprit, consider reinstalling it or searching for updates to resolve known compatibility issues. In extreme cases, temporarily uninstalling suspect applications may be necessary to pinpoint the source of the conflict.
Adjusting Microphone Settings in Applications
Applications like Zoom, Discord, and Skype have their own microphone settings that need to be correctly configured. Incorrect settings can lead to poor audio quality or no audio input.
- Zoom: Within a Zoom meeting, click the ^ arrow next to your microphone icon. Select your desired microphone from the list. You can also adjust the input volume and mute/unmute the microphone from this menu. The settings menu allows for further adjustments to audio input/output devices and echo cancellation.
- Discord: Go to User Settings (gear icon). Select “Voice & Video”. Choose your microphone from the “Input Device” dropdown menu. Adjust the input volume slider as needed. Test your microphone using the “Voice Activity Detection” settings to fine-tune sensitivity.
- Skype: Click your profile picture, then select “Settings”. Go to “Audio & Video”. Select your microphone from the “Microphone” dropdown menu. Adjust the volume using the slider. You can also test the microphone and speaker using the test call option.
Advanced Troubleshooting and Optimization
If basic troubleshooting steps haven’t resolved your microphone issues, more in-depth investigation is necessary. This section explores advanced techniques to pinpoint and rectify persistent microphone problems, ultimately improving your audio quality. We’ll delve into utilizing system tools, understanding microphone settings, and leveraging audio editing software for a comprehensive solution.
Testing Microphone Input with the Built-in Sound Recorder
The operating system’s built-in sound recorder provides a simple yet effective way to assess your microphone’s input levels and audio quality. Recording a short audio sample allows you to visually inspect waveforms and listen for any anomalies. A clean, consistent waveform indicates a healthy microphone signal, while distortions or unusually low levels suggest problems. For instance, a weak signal might appear as a very small waveform, while clipping (a form of distortion) will show peaks that are “clipped” or flattened at the top and bottom of the waveform. Analyzing these recordings helps determine if the issue lies with the microphone itself, its connection, or the system’s settings.
Microphone Settings: Sample Rate and Bit Depth
Sample rate and bit depth are crucial microphone settings that significantly impact audio quality. The sample rate determines how many audio samples are recorded per second, measured in Hertz (Hz). A higher sample rate captures more audio data, resulting in a clearer, more detailed sound, but also requires more storage space and processing power. Bit depth refers to the number of bits used to represent each audio sample. A higher bit depth allows for a wider dynamic range and reduces quantization noise, leading to a richer, more nuanced sound.
The following table illustrates the effects of different sample rate and bit depth combinations:
| Sample Rate (Hz) | Bit Depth (bits) | Audio Quality | Storage Requirements | Processing Demands |
|---|---|---|---|---|
| 44100 | 16 | Good, suitable for most applications | Moderate | Low |
| 48000 | 16 | Slightly better than 44100 Hz, 16-bit | Slightly higher | Slightly higher |
| 44100 | 24 | Higher dynamic range, less noise | Higher | Moderate |
| 96000 | 24 | Excellent quality, suitable for professional applications | Very high | High |
Note that higher settings don’t always translate to better audio if other factors, such as background noise or microphone quality, are limiting.
Using Audio Editing Software for Issue Identification
Audio editing software offers advanced tools to analyze and diagnose microphone problems. By importing a recording made with the problematic microphone, you can pinpoint specific issues.
- Import the recording into your chosen audio editing software (Audacity, Adobe Audition, etc.).
- Visually inspect the waveform for distortions, clipping (flattened peaks), or excessive noise.
- Use the software’s zoom function to examine the waveform in detail. Look for sudden spikes or dips that indicate intermittent connection problems.
- Employ noise reduction tools to isolate and reduce background noise. Many programs offer automatic noise reduction features, allowing you to select a section of silence to profile the noise and then apply a reduction effect to the entire recording.
- Listen to the recording carefully, paying attention to any crackling, hissing, or other artifacts that might indicate hardware or driver problems.
Final Thoughts
Successfully troubleshooting microphone problems requires a methodical approach, combining hardware checks with software configuration adjustments. By following the steps Artikeld in this guide, from verifying basic connections to optimizing advanced audio settings, you can effectively diagnose and resolve a wide range of microphone issues. Remember, patience and a systematic approach are key to restoring clear and reliable audio communication.