Stranded on a trail with a dead ATV battery? Knowing how to diagnose and fix electrical issues can mean the difference between a frustrating breakdown and a continued adventure. This guide provides nine trail-tested techniques to tackle five common ATV electrical problems, empowering you to handle most electrical malfunctions with confidence, even in remote locations.
We’ll cover troubleshooting steps for dead batteries, faulty charging systems, malfunctioning lights, non-functional starters, and problematic wiring. Learn practical, step-by-step solutions, essential tools needed for diagnosis and repair, and preventative maintenance strategies to keep your ATV running smoothly. Mastering these techniques will significantly increase your off-road independence and enjoyment.
Common ATV Electrical Problems & Troubleshooting Steps
Keeping your ATV’s electrical system in top shape is crucial for reliable operation and safety on the trails. A malfunctioning electrical component can leave you stranded, especially in remote areas. This section details five common electrical problems, their symptoms, troubleshooting steps, and potential causes. Understanding these issues will empower you to diagnose and often resolve problems yourself, saving time and money.
Dead Battery
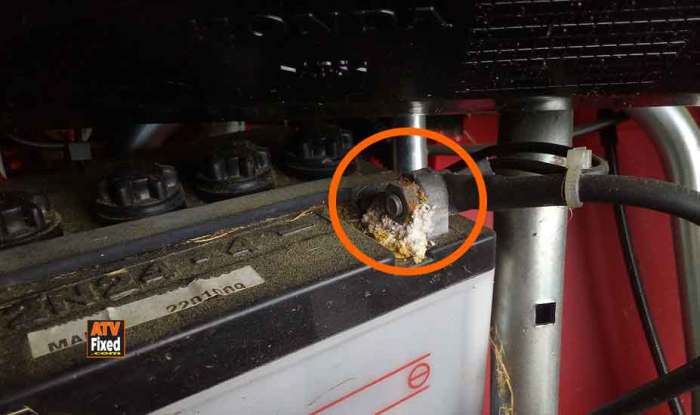
A dead battery is a frequent culprit for ATV electrical woes. This can stem from various issues, including leaving lights on, a faulty charging system, or simply a battery reaching the end of its lifespan.
| Problem | Symptoms | Troubleshooting Steps | Potential Causes |
|---|---|---|---|
| Dead Battery | No power to any electrical components; engine won’t crank. | 1. Check battery terminals for corrosion and clean if necessary. 2. Test battery voltage using a multimeter. A reading below 12.6V indicates a low charge. 3. Attempt to jump-start the ATV using jumper cables and a fully charged battery. 4. If jump-starting works, the battery may need charging or replacement. 5. If jump-starting doesn’t work, proceed to check the charging system. |
Low battery charge, parasitic drain, faulty battery, corroded terminals. |
Faulty Charging System
The charging system, consisting of the alternator (or stator), voltage regulator, and battery, ensures the battery remains charged while the engine runs. Failure here leads to a continually depleting battery.
| Problem | Symptoms | Troubleshooting Steps | Potential Causes |
|---|---|---|---|
| Faulty Charging System | Battery consistently discharges, even after charging; dim headlights while the engine runs. | 1. With the engine running, measure the voltage at the battery terminals. It should be between 13.5V and 14.5V. Lower voltage suggests a charging problem. 2. Check the alternator (or stator) output using a multimeter. A low output indicates a faulty alternator. 3. Inspect the voltage regulator for any signs of damage or overheating. A faulty regulator can prevent proper charging. 4. Inspect wiring connections to the alternator, regulator, and battery for looseness or corrosion. |
Faulty alternator, malfunctioning voltage regulator, wiring issues. |
Malfunctioning Lights
Headlights, taillights, and brake lights are essential for safety. Problems can range from blown bulbs to faulty wiring.
| Problem | Symptoms | Troubleshooting Steps | Potential Causes |
|---|---|---|---|
| Malfunctioning Lights | One or more lights not working; flickering lights. | 1. Check the bulbs for burnouts. Replace as needed. 2. Inspect the wiring harness for any breaks, chafing, or loose connections near the light fixtures. 3. Test the light switch and related wiring for continuity using a multimeter. 4. If the problem persists, check the fuses related to the lighting circuit. |
Blown bulbs, faulty wiring, failed switch, blown fuse. |
Non-Functional Starter
A non-functioning starter prevents the engine from cranking, leaving you immobile.
| Problem | Symptoms | Troubleshooting Steps | Potential Causes |
|---|---|---|---|
| Non-Functional Starter | Engine won’t crank; clicking sound when the ignition is turned. | 1. Check the battery voltage. A low voltage can prevent the starter from engaging. 2. Check the starter relay. A clicking sound often indicates a faulty relay. 3. Inspect the starter motor itself for damage or binding. This may require removal and testing. 4. Examine the wiring connecting the battery, starter relay, and starter motor for loose connections or damage. |
Low battery voltage, faulty starter relay, faulty starter motor, damaged wiring. |
Problematic Wiring
Damaged or corroded wiring is a common cause of many electrical problems. Water, vibration, and age can all contribute to wiring issues.
| Problem | Symptoms | Troubleshooting Steps | Potential Causes |
|---|---|---|---|
| Problematic Wiring | Intermittent electrical failures, shorts, open circuits. | 1. Visually inspect all wiring harnesses for any signs of damage, corrosion, or chafing. 2. Use a multimeter to check for continuity in suspect wiring sections. 3. Repair or replace any damaged wiring. 4. Address any corrosion by cleaning terminals and connections. |
Corrosion, damage from abrasion, rodent damage, poor connections. |
Essential Tools for ATV Electrical Troubleshooting:
- Multimeter
- Jumper cables
- Wire strippers/crimpers
- Test light
- Screwdrivers (Phillips and flathead)
- Socket wrench set
- Electrical tape
- Wire connectors
- Battery charger
Trail-Tested Repair Techniques for ATV Electrical Systems
This section details nine practical, trail-side repair techniques for common ATV electrical problems. These methods prioritize readily available tools and materials, focusing on solutions achievable even in remote locations. Remember safety first: always disconnect the battery before working on any electrical component.
Effective troubleshooting involves a systematic approach. Begin by identifying the specific problem (e.g., no lights, no spark, dead battery). Then, use basic electrical testing to pinpoint the fault before attempting repairs. The techniques described below offer various solutions, each with its strengths and weaknesses depending on the situation and available resources.
Troubleshooting Dead Battery
A dead battery is a common ATV problem. Several factors can contribute, including leaving lights on, a faulty charging system, or a corroded battery terminal.
| Repair Method | Advantages | Disadvantages | Applicability |
|---|---|---|---|
| Jump Starting | Quickest solution; requires minimal tools. | Requires a second ATV or portable jump starter; may damage electronics if done incorrectly. | Suitable for temporary fixes or when a fully charged battery is available. |
| Battery Charging (with portable charger) | Restores battery capacity; long-term solution. | Requires a portable charger and sufficient charging time. | Best for situations where a charging source is available and sufficient time exists. |
| Replacing the Battery | Complete solution; ensures reliable starting. | Requires a replacement battery; may be expensive or unavailable in remote areas. | Ideal when a new battery is accessible, and the old battery is beyond repair. |
Testing Battery Voltage
Accurately assessing battery voltage is crucial for diagnosing electrical problems. A multimeter is the ideal tool, but a simple voltage tester can suffice.
Step-by-Step Guide (using a multimeter):
- Ensure the ATV is turned off and the battery is disconnected.
- Set the multimeter to DC voltage (V) measurement.
- Connect the multimeter’s red lead to the positive (+) battery terminal and the black lead to the negative (-) terminal.
- Observe the voltage reading. A fully charged 12V battery should read around 12.6V. Readings below 12V indicate a low charge, while readings significantly lower suggest a faulty battery.
Repairing a Broken Wire
Broken wires are common in ATVs due to vibration and rough terrain. Repairing them requires careful splicing and insulation.
| Repair Method | Advantages | Disadvantages | Applicability |
|---|---|---|---|
| Soldering and Heat Shrink Tubing | Strong and durable repair; provides excellent insulation. | Requires soldering iron and heat shrink tubing; not ideal for quick fixes. | Best for permanent repairs where quality is prioritized. |
| Crimping Connectors | Faster than soldering; readily available connectors. | Connection may be less durable than soldering; connector size must match wire gauge. | Suitable for quick repairs, particularly in remote areas. |
| Electrical Tape | Quickest and easiest method; requires minimal tools. | Least durable; prone to failure; insulation may not be sufficient. | Suitable only as a temporary fix; not recommended for long-term repairs. |
Troubleshooting No Headlights
No headlights can be caused by blown bulbs, faulty wiring, or a problem with the switch or battery.
| Repair Method | Advantages | Disadvantages | Applicability |
|---|---|---|---|
| Replacing the Bulb | Simple and inexpensive; readily available bulbs. | Only addresses bulb failure; doesn’t solve wiring or switch problems. | First step in troubleshooting headlight failure; easy to perform. |
| Checking Wiring and Connections | Identifies wiring faults; can be repaired with basic tools. | Requires some electrical knowledge; may involve tracing wires. | Necessary if bulb replacement doesn’t resolve the issue. |
| Testing the Headlight Switch | Determines if the switch is faulty. | Requires multimeter or test light; may necessitate switch replacement. | Important if wiring and bulb are functioning correctly. |
Troubleshooting No Spark
A lack of spark indicates a problem within the ignition system, potentially involving the ignition coil, spark plug, or wiring.
| Repair Method | Advantages | Disadvantages | Applicability |
|---|---|---|---|
| Checking Spark Plug | Simple check; easy to replace. | Only addresses spark plug issues; doesn’t identify problems with the ignition coil or wiring. | First step in troubleshooting; quick and easy. |
| Testing Ignition Coil | Identifies coil failure; relatively straightforward test. | Requires a multimeter; coil replacement may be necessary. | Necessary if the spark plug is good but no spark is present. |
| Inspecting Ignition Wiring | Identifies broken or damaged wires. | Can be time-consuming; requires tracing wires. | Important to check for breaks or shorts in the wiring harness. |
Preventative Maintenance for ATV Electrical Systems

Proactive maintenance is crucial for ensuring the reliable operation of your ATV’s electrical system and preventing costly repairs down the line. Regular inspections and cleaning, coupled with the use of high-quality components, significantly reduce the likelihood of encountering electrical problems on the trail. This section details a preventative maintenance schedule and highlights essential safety precautions.
Regular preventative maintenance significantly extends the lifespan of your ATV’s electrical system and minimizes the risk of unexpected breakdowns. A well-maintained system not only enhances performance and reliability but also contributes to a safer riding experience. Neglecting maintenance can lead to more serious issues, including complete electrical failure, potentially stranding you in remote areas.
Preventative Maintenance Schedule
This schedule Artikels a recommended maintenance routine. Adjust the frequency based on your ATV’s usage and environmental conditions. More frequent checks are advisable in harsh environments or with increased usage.
| Task | Frequency | Details |
|---|---|---|
| Visual Inspection of Wiring | Before each ride | Check for frayed wires, loose connections, corrosion, or damage. Pay close attention to areas subject to vibration or abrasion. |
| Battery Terminal Cleaning | Monthly | Clean terminals with a wire brush and battery terminal cleaner. Apply dielectric grease to prevent corrosion. |
| Battery Voltage Check | Monthly | Use a multimeter to check the battery voltage. A fully charged battery should read approximately 12.6 volts. |
| Fuse Inspection | Every 3 months | Check all fuses for signs of blowing or damage. Replace any blown fuses with the correct amperage rating. |
| Electrical Component Inspection | Annually | Inspect all electrical components, including lights, switches, and the starter, for damage or wear. |
| Complete System Check | Annually | Conduct a thorough inspection of the entire electrical system, including wiring harnesses and connectors. Consider professional inspection if needed. |
Importance of High-Quality Components and Proper Wiring Techniques
Using high-quality components is paramount to ensuring the longevity and reliability of your ATV’s electrical system. Cheap components are more prone to failure, leading to potential breakdowns and safety hazards. Proper wiring techniques, including the use of appropriate connectors and wire gauges, minimize the risk of short circuits and electrical fires. For example, using a wire gauge too small for the amperage rating can lead to overheating and potential fire hazards. Similarly, improperly crimped connectors can lead to loose connections and intermittent electrical failures.
Safety Precautions When Working on ATV Electrical Systems
Working with ATV electrical systems presents potential hazards, including electrical shock, short circuits, and fire. Adhering to safety precautions is critical to avoid injury or damage.
- Disconnect the Battery: Always disconnect the negative (-) battery terminal before working on any part of the electrical system. This prevents accidental short circuits and protects you from electrical shock.
- Use Insulated Tools: Use insulated tools to avoid electrical shock. Ensure the insulation is in good condition and replace damaged tools immediately.
- Wear Safety Glasses: Wear safety glasses to protect your eyes from sparks or flying debris.
- Work in a Well-Ventilated Area: Ensure adequate ventilation to prevent the buildup of potentially harmful fumes from battery acid or other chemicals.
- Avoid Contact with Battery Acid: Battery acid is corrosive and can cause severe burns. Wear gloves and eye protection when handling the battery.
- Use a Fire Extinguisher: Keep a fire extinguisher nearby in case of a fire. Know how to use it properly.
- Consult a Professional: If you are unsure about any aspect of electrical repair, consult a qualified mechanic. Improper repairs can lead to serious safety hazards.
Last Word

By understanding the common electrical issues plaguing ATVs and implementing the nine trail-tested repair techniques Artikeld in this guide, you’ll be well-equipped to handle most electrical problems encountered on the trail. Remember that preventative maintenance is key to avoiding breakdowns. Regular checks and proactive maintenance will ensure your ATV’s electrical system remains reliable, maximizing your time exploring the trails and minimizing frustrating downtime. Stay safe, and happy riding!