Frustrated with a malfunctioning webcam? Whether it’s refusing to connect, producing blurry images, or failing to work with specific applications, these issues can disrupt video calls, online presentations, and more. This guide provides clear, step-by-step solutions to four common webcam problems, empowering you to troubleshoot effectively and restore your webcam’s functionality.
We’ll cover everything from basic troubleshooting steps like checking connections and updating drivers to more advanced techniques for resolving software conflicts and optimizing image quality. By the end, you’ll possess the knowledge to diagnose and fix most webcam issues, ensuring smooth and reliable video performance.
Webcam Not Detected

A webcam not being detected by your computer can be frustrating, but it’s often a solvable issue. This usually stems from problems with the webcam’s connection, drivers, or the computer’s configuration. Let’s explore the common causes and troubleshooting steps.
Several factors can prevent your computer from recognizing your webcam. These include faulty hardware, incorrect driver installation, USB port issues, and even conflicts with other devices. Addressing these potential problems systematically will help pinpoint the source of the issue.
Troubleshooting Webcam Detection Issues
This section details a step-by-step process for resolving webcam detection problems. Following these steps methodically will increase your chances of successfully identifying and fixing the problem.
- Check Device Manager: Open the Device Manager (search for it in the Windows search bar). Look under “Imaging devices” or “Cameras.” If your webcam is listed with a yellow exclamation mark or is missing entirely, it indicates a driver or connection problem.
- Update Webcam Drivers: If your webcam appears in Device Manager but isn’t working correctly, updating the drivers is crucial. Right-click the webcam entry, select “Update driver,” and choose to search automatically for drivers. Alternatively, you can download the latest drivers from the webcam manufacturer’s website.
- Reinstall Webcam Drivers: If updating doesn’t work, try reinstalling the drivers. In Device Manager, right-click the webcam entry, select “Uninstall device,” and then restart your computer. Windows will usually automatically reinstall the drivers upon reboot.
- Check Physical Connection: Ensure the webcam is securely connected to a USB port. Try a different USB port, especially one directly on the computer (not a USB hub), to rule out port issues. Also, visually inspect the USB cable for any damage.
- Restart Your Computer: A simple restart can often resolve temporary software glitches that might be preventing webcam detection.
Reinstalling Webcam Drivers and Compatibility
Reinstalling drivers ensures a clean installation, removing any corrupted or conflicting files. The process typically involves uninstalling the current drivers through Device Manager (as described above), restarting the computer, and allowing Windows to automatically reinstall them or manually installing the drivers downloaded from the manufacturer’s website. Always ensure you download drivers specifically designed for your operating system (Windows 10, Windows 11, macOS, etc.) and webcam model. Incorrect driver versions can lead to incompatibility issues.
Verifying Webcam’s Physical Connection and Testing with Different USB Ports
A loose connection or a faulty USB port can easily prevent your computer from detecting your webcam. Try connecting the webcam to different USB ports, including those directly on the computer’s motherboard, bypassing any USB hubs. Inspect the USB cable for any signs of damage like fraying or bending. If possible, try using a different USB cable to rule out cable malfunction as a potential cause.
Troubleshooting Steps and Potential Solutions
| Step | Potential Problem | Solution | Outcome |
|---|---|---|---|
| Check Device Manager | Driver issues, hardware failure, connection problems | Check for yellow exclamation marks, update or reinstall drivers | Webcam appears correctly, or problem is identified |
| Update Webcam Drivers | Outdated or corrupted drivers | Download latest drivers from manufacturer’s website | Improved webcam functionality or no change |
| Reinstall Webcam Drivers | Corrupted driver files | Uninstall and reinstall drivers via Device Manager | Successful detection and functionality, or persistence of the issue |
| Check Physical Connection | Loose connection, faulty USB port, damaged cable | Try different USB ports, inspect cable for damage | Webcam works in a different port, indicating a port or cable problem |
Poor Webcam Image Quality
Webcam image quality can significantly impact video calls, recordings, and overall user experience. Several factors can contribute to poor image quality, ranging from simple issues like dust on the lens to more complex problems with your webcam’s settings or lighting conditions. Addressing these issues can dramatically improve the clarity and visual appeal of your webcam feed.
Poor image quality often stems from a combination of factors. Low resolution is a common culprit; older webcams or those with lower megapixel counts naturally produce less detail. Insufficient lighting is another major contributor, leading to dark, grainy images. Incorrect webcam settings, such as low brightness or contrast, can also negatively impact image quality. Finally, a dirty lens can obscure the image, introducing smudges and blurring.
Adjusting Webcam Settings
Optimizing your webcam’s settings is a crucial step in improving image quality. Most webcams offer adjustable parameters for brightness, contrast, and saturation. Brightness controls the overall lightness or darkness of the image; increasing it can brighten a dim image, while decreasing it can reduce overexposure. Contrast adjusts the difference between light and dark areas, enhancing detail and definition. Saturation controls the intensity of colors; increasing it makes colors more vibrant, while decreasing it produces a more muted effect. Experiment with these settings to find the optimal balance for your lighting conditions and personal preference. Many webcam software applications provide visual feedback as you adjust these settings, allowing for real-time optimization.
Cleaning the Webcam Lens
A clean lens is essential for sharp, clear images. Dust, fingerprints, and smudges can significantly reduce image quality. To clean your webcam lens, gently use a microfiber cloth to wipe away any debris. Avoid using harsh chemicals or abrasive materials, which could scratch the lens. For stubborn smudges, lightly dampen the cloth with distilled water. Remember to always power off the webcam before cleaning. Regular cleaning will prevent the accumulation of dirt and maintain optimal image clarity.
Optimizing Lighting Conditions
Lighting plays a critical role in webcam image quality. Insufficient lighting results in dark, noisy images, while excessive light can cause overexposure and wash out details. Ideally, position yourself in front of a light source, such as a window or lamp, to ensure even illumination. Avoid backlighting, where the light source is behind you, as this creates a silhouette effect. Consider using an external light source, such as a ring light or softbox, for professional-looking results. These provide controlled and even illumination, minimizing shadows and enhancing detail. Experiment with different lighting positions and intensities to find what works best for your setup.
Steps to Improve Webcam Image Quality
A simple guide to improving your webcam image quality involves these steps:
- Check your webcam’s resolution settings and select the highest available resolution.
- Adjust brightness, contrast, and saturation in your webcam software until you achieve a balanced and clear image.
- Clean your webcam lens gently with a microfiber cloth.
- Position yourself in front of a light source to ensure even illumination. Avoid backlighting.
- Consider using an external light source, such as a ring light, for professional results.
Webcam Not Working with Specific Applications
Many users experience situations where their webcam functions perfectly in one application but fails in another. This incompatibility isn’t necessarily a hardware problem; it often stems from permission restrictions, software conflicts, or outdated application drivers. Understanding these potential causes and employing effective troubleshooting techniques can quickly restore your webcam’s functionality across all your applications.
This section will guide you through identifying and resolving these application-specific webcam issues. We’ll explore permission settings, software conflict resolution, and the importance of keeping your applications up-to-date.
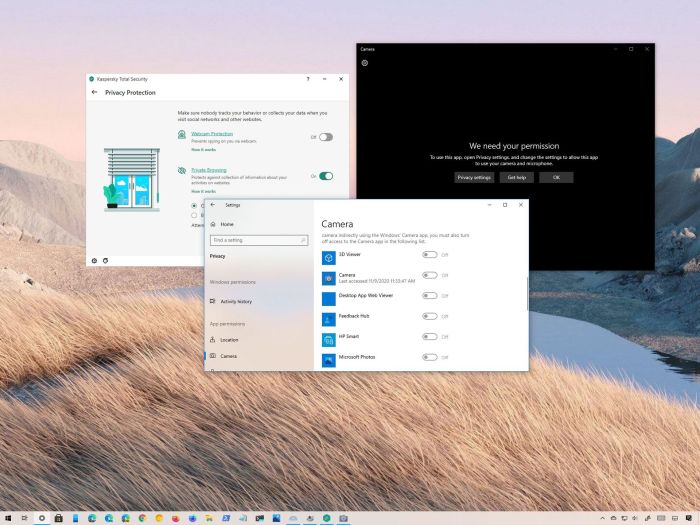
Application Permissions
Applications require explicit permission to access your webcam’s hardware. If permission is denied, the application will be unable to utilize the webcam. This is a common security feature implemented by modern operating systems to protect user privacy. Checking and adjusting these permissions is the first step in troubleshooting application-specific webcam problems. For example, on Windows, you might find these settings within the application’s privacy settings in the system settings menu, while on macOS, you would likely find them in System Preferences under Security & Privacy. Granting the necessary access usually involves locating the application in the permission list and toggling the webcam access switch to “On” or “Allow.”
Resolving Software Conflicts
Sometimes, conflicting software installations or outdated drivers can interfere with an application’s ability to access the webcam. This often manifests as the webcam not being recognized by a specific program, even if it works in others. One approach to resolving this involves identifying and uninstalling any conflicting software. This might include older webcam software or applications that may be attempting to control the webcam simultaneously. Another strategy is to temporarily disable other applications that might be using the webcam, to see if the conflict is resolved. A clean reboot after uninstalling or disabling applications can help ensure that the system correctly recognizes and allocates resources.
Updating or Reinstalling Applications
Outdated applications may not be compatible with your current webcam drivers or operating system. Updating the application to its latest version often resolves compatibility issues. If updating doesn’t work, reinstalling the application can help to ensure a clean installation without any corrupted files. This involves completely uninstalling the application, restarting your computer, and then reinstalling it from a trusted source, such as the application’s official website. It’s crucial to download applications from reputable sources to avoid introducing malware or other harmful software.
Troubleshooting Checklist for Application-Specific Webcam Issues
Before seeking more advanced solutions, it’s beneficial to follow a structured approach. This checklist can help you systematically diagnose and fix webcam problems within specific applications.
- Verify Webcam Functionality: Test the webcam in a different application to confirm it’s working correctly. This helps rule out hardware issues.
- Check Application Permissions: Review your operating system’s privacy settings to ensure the application has permission to access the webcam.
- Identify and Resolve Software Conflicts: Temporarily disable other applications that might be using the webcam, or uninstall conflicting software.
- Update or Reinstall the Application: Download the latest version of the application or reinstall it completely to eliminate corrupted files.
- Restart Your Computer: A simple reboot can often resolve temporary software glitches.
- Check Device Manager (Windows) or System Information (macOS): Look for any error messages related to your webcam or drivers.
- Update Webcam Drivers: Ensure your webcam drivers are up-to-date by visiting the manufacturer’s website.
Final Review

Addressing common webcam problems doesn’t require extensive technical expertise. By systematically following the troubleshooting steps Artikeld in this guide, you can effectively resolve most issues and restore your webcam’s functionality. Remember to check connections, update drivers, optimize settings, and address potential software conflicts. With a little patience and these practical solutions, you can enjoy clear, reliable video communication.