Keeping your scooter’s brakes in top condition is crucial for safe riding. This guide tackles three common brake problems—worn pads, damaged cables, and faulty levers—offering straightforward solutions. We’ll walk you through four simple checks to diagnose the issue, empowering you to address minor problems yourself and identify when professional help is needed. Understanding your scooter’s braking system is key to preventing accidents and enjoying worry-free rides.
From a quick visual inspection to more involved checks, we’ll provide clear, step-by-step instructions, making brake maintenance accessible even to novice scooter owners. Whether you’re dealing with squeaky brakes, a spongy feel, or complete brake failure, this guide will help you get back on the road safely and confidently.
Identifying Common Scooter Brake Problems
Maintaining your scooter’s braking system is crucial for safe riding. Neglecting regular checks can lead to dangerous situations. This section details three common brake issues, their symptoms, causes, and how to visually inspect for them.
Worn Brake Pads
Worn brake pads are a frequent problem, resulting from normal wear and tear. Visual inspection is key to identifying this issue. Imagine a brake pad: initially, it’s a rectangular block of material, usually a composite of friction materials. As the scooter brakes, this material gradually wears down. A severely worn brake pad will show a significantly reduced thickness, perhaps even exposing the metal backing plate. This reduction in material directly impacts braking performance, leading to increased stopping distances. You might also notice a grinding or squeaking sound when braking. A visual inspection should focus on the thickness of the pads and the condition of their surfaces. Look for grooves, excessive wear on one side, or any signs of cracking or damage. A picture of worn brake pads would show a thin layer of friction material remaining, possibly with exposed metal edges. The pads may also appear glazed or unevenly worn.
Damaged Brake Cables
Brake cables, responsible for transmitting force from the lever to the brake mechanism, are susceptible to damage. Over time, cables can become frayed, corroded, or stretched. A frayed cable will show visible strands breaking away from the main cable, weakening its ability to effectively transfer braking force. Corrosion manifests as rust or discoloration, reducing the cable’s flexibility and potentially causing it to seize. Stretched cables result in a spongy brake feel, requiring more lever travel to achieve adequate braking. A visual inspection should cover the entire length of the cable, checking for any signs of fraying, rust, or kinks. Examine the cable housing for damage as well. A picture depicting damaged brake cables might show a frayed cable with exposed wires, or a rusty and stiff cable within its housing.
Malfunctioning Brake Levers
Brake levers themselves can malfunction, usually due to wear or damage. A broken or damaged lever will likely prevent effective braking. A lever that feels loose or wobbly indicates potential problems with its mounting or internal mechanisms. Excessive play in the lever, meaning there’s significant movement before any braking action occurs, suggests a problem with the cable tension or lever adjustment. A cracked or broken lever is immediately apparent and obviously needs repair or replacement. Visual inspection should focus on the lever’s overall condition, checking for cracks, looseness, and smooth operation. Examine the pivot point for any signs of wear or damage. A picture of a malfunctioning brake lever could show a cracked lever, excessive play at the pivot point, or a lever that’s bent or misaligned.
Comparison of Brake Problems
| Problem | Symptoms | Causes | Severity |
|---|---|---|---|
| Worn Brake Pads | Reduced braking power, increased stopping distance, grinding or squeaking sounds | Normal wear and tear, aggressive braking | Medium to High (can lead to complete brake failure if ignored) |
| Damaged Brake Cables | Spongy brakes, reduced braking power, difficulty braking | Corrosion, fraying, stretching, damage to cable housing | Medium to High (can lead to complete brake failure) |
| Malfunctioning Brake Levers | No braking, weak braking, loose or wobbly lever | Wear, damage, improper adjustment | High (can lead to immediate and dangerous brake failure) |
Four Easy Checks for Scooter Brake Troubleshooting
Identifying and resolving brake problems on your scooter can often be a straightforward process. By performing a few simple checks, you can quickly determine the source of the issue and potentially fix it yourself, saving time and money. This section details four easy checks, progressing from the simplest visual inspection to a slightly more involved operational test. Remember safety first; always ensure your scooter is stable and parked securely before performing any checks.
Visual Inspection of Brake Pads and Rotors
A quick visual inspection of your brake pads and rotors is the easiest and quickest way to identify potential problems. Start by carefully examining the brake pads. Look for signs of excessive wear, damage, or contamination.
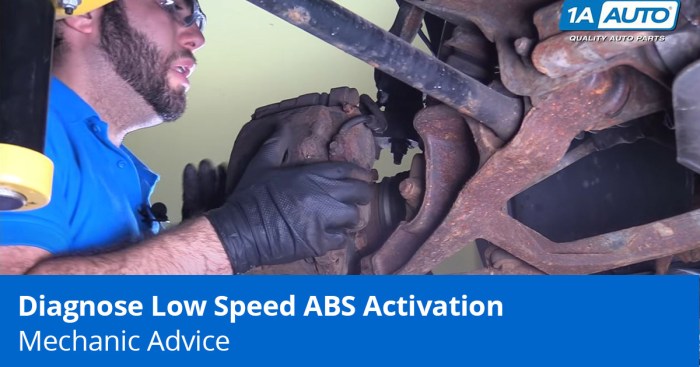
Image Description: The image shows a close-up view of a scooter’s brake caliper. The brake pads are clearly visible, one showing significant wear with only a thin layer of friction material remaining, while the other appears relatively new. The rotor, a metallic disc, shows no obvious damage or scoring. The image highlights the difference in pad wear, indicating a need for replacement of the worn pad.
Next, inspect the rotor itself. Look for any signs of damage such as deep grooves, cracks, or excessive rust. Significant damage to the rotor may require professional replacement. Minor surface rust can often be cleaned.
Image Description: This image depicts a scooter rotor exhibiting significant scoring and deep grooves. The surface is uneven and shows signs of significant wear, indicating a potential safety hazard and the need for replacement. The image also shows a comparison to a new, undamaged rotor for clarity.
Cable and Lever Free Movement Check
This check assesses the condition and free movement of the brake cable and lever. A stiff or binding cable can prevent the brakes from engaging effectively.
Image Description: The image shows a hand gently squeezing the brake lever. The accompanying close-up shows the brake cable connected to the lever and running smoothly to the caliper. A clear arrow points to the cable’s connection point to highlight the smooth, unimpeded movement.
Gently squeeze the brake lever. It should move smoothly and return to its original position without sticking or binding. If the lever feels stiff or doesn’t return fully, the cable may be damaged or require lubrication. Check for any kinks or damage along the cable’s length.
Brake Lever Free Play
This step involves checking the amount of free play in the brake lever before the brakes start to engage. Excessive free play indicates a problem that needs addressing.
Image Description: The image shows a close-up of a brake lever with a ruler positioned to measure the distance from the handlebar to the lever before engagement. The ruler shows a measurement of approximately 1-2mm, representing the acceptable free play range. Another image shows a lever with excessive free play, with a measurement of 5mm.
There should be a small amount of free play in the lever before the brakes begin to engage. This is usually a small gap, around 1-2mm. Excessive free play indicates a need for cable adjustment or replacement.
Brake Function Test
This is the most comprehensive check, requiring a test ride. It verifies the overall braking performance and responsiveness.
Image Description: The image shows a person riding a scooter in a safe, controlled environment, gently applying the brakes. The scooter’s wheels are visible, indicating that the brakes are working and slowing the scooter down. A second image displays the rider safely stopping the scooter.
Perform a test ride in a safe, open area. Gently apply the brakes at low speeds. The brakes should engage smoothly and bring the scooter to a controlled stop. If the brakes feel weak, spongy, or unresponsive, there is likely a more significant issue requiring professional attention.
Basic Scooter Brake Repair and Maintenance
Regular maintenance is crucial for ensuring your scooter’s brakes function optimally and safely. Neglecting brake maintenance can lead to reduced braking power, increased stopping distances, and potentially dangerous situations. This section details essential repair and maintenance procedures to keep your scooter’s braking system in top condition.
Replacing worn brake pads is a straightforward process, but proper technique is essential for safety and effectiveness. Adjusting brake cables ensures consistent brake lever feel and sufficient braking force. A damaged brake lever, whether from a crash or wear, needs prompt repair or replacement to maintain braking efficiency. Furthermore, regular cleaning and lubrication of brake components significantly extend their lifespan and performance. Finally, bleeding hydraulic brake systems (if applicable) is necessary to remove air bubbles that can impede braking performance.
Replacing Worn Brake Pads
Worn brake pads are a common issue and relatively easy to replace. First, locate the brake caliper, which houses the brake pads. Typically, you’ll need to remove a retaining pin or bolt to access the pads. Once removed, compare the new pads to the old ones to ensure correct installation. Install the new pads, ensuring they sit correctly within the caliper. Reassemble the caliper and test the brakes thoroughly before riding. Remember to always consult your scooter’s manual for specific instructions and torque specifications.
Adjusting Brake Cables
Brake cable adjustment is crucial for maintaining optimal braking performance. Locate the barrel adjuster on the brake cable housing, usually near the brake lever. Turn the adjuster to tighten or loosen the cable. A properly adjusted cable will provide a firm brake lever feel without excessive free play. Too much slack results in weak braking, while excessive tension can make the lever feel stiff and potentially damage the brake system. After adjustment, test the brakes carefully to ensure proper functionality.
Repairing or Replacing a Damaged Brake Lever
A damaged brake lever compromises braking safety and needs immediate attention. If the lever is bent or cracked, replacement is often the best solution. Replacement involves removing the old lever, often secured with a bolt or clamp, and installing the new lever, ensuring proper alignment and secure fastening. If the damage is minor, such as a slight bend, careful straightening might be possible, but only if it doesn’t compromise the lever’s structural integrity. Always prioritize safety; if unsure, replace the lever.
Brake System Cleaning and Lubrication
Regular cleaning and lubrication of brake components are vital for long-term performance. Clean the brake calipers, brake pads, and cable housing with a suitable cleaner, removing any dirt, grime, or brake dust. Lubricate moving parts, such as cable housings, with a suitable lubricant specifically designed for brake systems. Avoid using excessive lubricant, as it can attract dirt and compromise braking performance. This simple maintenance routine prevents premature wear and tear and ensures optimal braking efficiency.
Bleeding Hydraulic Brake Systems
Hydraulic brake systems require bleeding to remove air bubbles that can hinder braking performance. This process typically involves opening a bleed valve on the caliper while depressing the brake lever repeatedly. This forces air bubbles out of the system, replacing them with brake fluid. A helper is often necessary to operate the lever while you monitor and control the bleed valve. Always use the correct type of brake fluid and consult your scooter’s manual for specific instructions. Improper bleeding can damage the hydraulic system, so careful attention to detail is paramount.
Wrap-Up
Maintaining your scooter’s brakes is a simple yet vital task for ensuring safe and enjoyable rides. By understanding the common issues, performing regular checks, and knowing when to seek professional help, you can significantly reduce the risk of accidents. Remember, proactive maintenance is far better than reactive repairs. This guide provided the tools; now it’s time to keep your scooter’s braking system in optimal condition.