Frustrated with blurry, pixelated webcam videos? Achieving crisp, clear video calls and recordings shouldn’t be a struggle. This guide provides a straightforward, five-step process to diagnose and resolve common webcam issues, ensuring your next video conference or online presentation is professional and polished. We’ll explore hardware troubleshooting, software optimization, and environmental factors to enhance your webcam’s performance significantly.
From checking connections and updating drivers to mastering lighting and adjusting software settings, we’ll cover everything you need to know to transform your webcam experience. Whether you’re a seasoned tech user or a complete beginner, these steps will empower you to troubleshoot effectively and achieve consistently high-quality video.
Troubleshooting Hardware Issues
Poor webcam quality isn’t always a software problem. Often, the culprit lies within the hardware itself. Understanding common hardware issues and how to troubleshoot them is crucial for achieving a crisp, clear video feed. This section will guide you through identifying and resolving these hardware-related problems.
Hardware Problems Affecting Webcam Quality
Several hardware-related issues can significantly impact your webcam’s performance. These problems range from simple connectivity issues to more serious hardware failures. Addressing these issues systematically can often resolve poor image quality.
| Problem | Cause | Solution | Example Image Description |
|---|---|---|---|
| Loose Connection | The webcam cable is not securely connected to either the webcam or the computer. | Reseat the webcam cable, ensuring it’s firmly plugged into both ends. Try a different USB port. | The image would show a slightly dislodged USB cable partially inserted into the USB port on the computer or the webcam. The connection point might appear loose or show a slight gap. |
| Driver Issues | Outdated, corrupted, or missing webcam drivers prevent the computer from properly communicating with the webcam. | Update or reinstall the webcam drivers using the device manager or the manufacturer’s website. | The image would show a screenshot of the Device Manager window, highlighting the webcam with a yellow exclamation mark indicating a driver problem. Alternatively, it could show a website interface displaying driver downloads for a specific webcam model. |
| Faulty Webcam | Internal hardware failure within the webcam itself (e.g., damaged sensor, malfunctioning lens). | Try a different webcam. If the problem persists, the issue is likely not with the webcam. Contact the manufacturer for warranty support or replacement. | The image would show a close-up of the webcam lens, potentially with visible scratches, damage, or dust obscuring the lens. Alternatively, it could show a blurry or distorted image consistently produced by the webcam, even after troubleshooting other potential causes. |
| USB Port Issues | The USB port itself might be malfunctioning, providing insufficient power or a faulty connection. | Try a different USB port. If possible, try connecting the webcam to a different computer to rule out the USB port as the problem. | The image would show a close-up of a USB port that is physically damaged (e.g., bent pins, discoloration). Alternatively, it could show a diagnostic message from the operating system indicating a problem with a specific USB port. |
Checking Webcam Connections
Secure connections are paramount for optimal webcam performance. Begin by carefully inspecting both ends of the webcam cable. Ensure the cable is firmly seated in the USB port on your computer and the webcam itself. Try different USB ports, prioritizing those directly connected to the motherboard rather than USB hubs, as hubs can sometimes introduce power or connectivity issues. Gently wiggle the cable to check for loose connections.
Updating or Reinstalling Webcam Drivers
Outdated or corrupted drivers are a common cause of poor webcam quality. Updating or reinstalling them can often resolve this. To update drivers, open your computer’s Device Manager (search for it in the Start Menu). Expand “Imaging devices,” locate your webcam, right-click, and select “Update driver.” Choose to search automatically for drivers or browse your computer for a manually downloaded driver (from the webcam manufacturer’s website). Reinstalling involves uninstalling the current driver and then restarting your computer; Windows will typically reinstall the driver automatically.
Troubleshooting Hardware Issues Flowchart
[The flowchart would be a visual representation. It would start with “Poor Webcam Quality?” branching to “Check Connections,” then to “Secure Connections? (Yes/No)”. A “No” would lead to “Reseat Cable, Try Different Port,” looping back to “Secure Connections?”. A “Yes” would lead to “Check Drivers,” then to “Update/Reinstall Drivers,” followed by a check for improved quality. If the quality remains poor after these steps, the flowchart would branch to “Check Webcam/USB Port,” then to “Test with Different Webcam/Computer,” concluding with “Faulty Hardware (Replace/Contact Manufacturer).” ]
Optimizing Software Settings
Optimizing your webcam’s software settings is crucial for achieving high-quality video. This involves adjusting parameters within your operating system and video conferencing applications to fine-tune image capture and processing. Proper configuration can significantly improve the clarity, brightness, and overall visual appeal of your webcam feed.
Many factors influence webcam image quality, and software settings play a significant role. By carefully adjusting resolution, frame rate, brightness, and compression, you can achieve a noticeable improvement in your video output. This section will guide you through optimizing these settings on both Windows and macOS systems, and explore how different video conferencing software handles these parameters.
Webcam Settings in Operating Systems
Adjusting your webcam settings directly within your operating system provides a foundation for better video quality across all applications. Both Windows and macOS offer control over basic parameters like resolution and brightness. These adjustments affect the raw image data before any application-specific processing occurs. It’s recommended to start by optimizing these system-level settings before moving on to application-specific configurations.
- Windows: Access webcam settings through the Camera app or the device manager. You can usually adjust brightness, contrast, and potentially other settings depending on your webcam model. Many modern webcams also provide their own software with more advanced settings.
- macOS: macOS’s settings for integrated webcams are typically less extensive than Windows. Brightness adjustments are commonly available. For external webcams, you might need to use the manufacturer’s provided software for more granular control.
Configuring Video Resolution, Frame Rate, and Brightness
Resolution, frame rate, and brightness are key parameters influencing the quality and smoothness of your video. Higher resolutions deliver sharper images, but require more processing power and bandwidth. Similarly, higher frame rates result in smoother video, but also demand more resources. Brightness adjustments ensure optimal visibility, preventing overexposure or underexposure.
- Resolution: Aim for the highest resolution your webcam and internet connection support. Common resolutions include 720p (1280×720) and 1080p (1920×1080). Higher resolutions result in clearer images, but require more bandwidth.
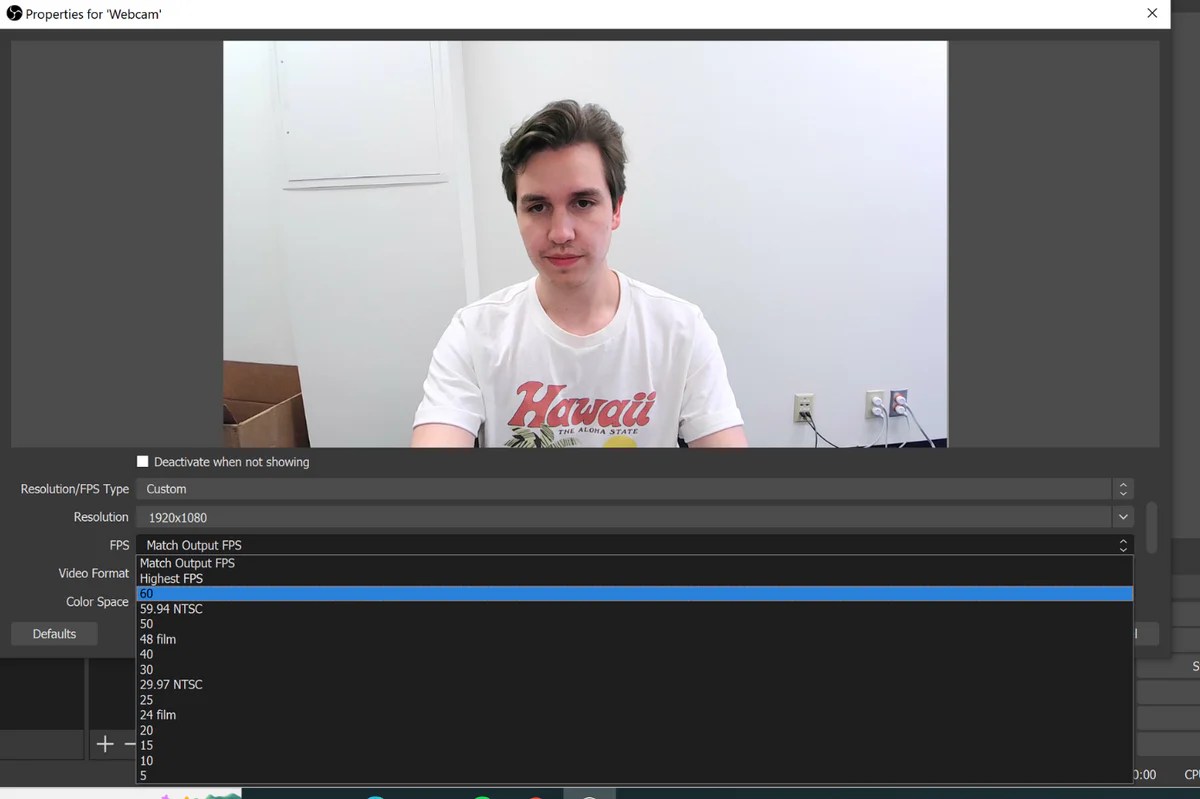
- Frame Rate: A higher frame rate (measured in frames per second or FPS) leads to smoother video. 30 FPS is generally sufficient for most applications, while 60 FPS provides noticeably smoother motion but requires more bandwidth.
- Brightness: Adjust brightness to ensure your face is well-lit and details are visible without overexposure or harsh shadows. Experiment to find the optimal setting for your lighting conditions.
Impact of Compression Settings on Video Quality and File Size
Compression algorithms reduce the size of video files by removing redundant information. Higher compression levels result in smaller file sizes but can lead to a loss of image quality, resulting in artifacts or blurring. Lower compression levels preserve more detail but create larger files. The ideal setting depends on the balance between quality and file size requirements. Most video conferencing software automatically handles compression, but understanding the trade-offs is important for troubleshooting.
Comparison of Video Conferencing Software
Different video conferencing applications handle video processing and compression differently, resulting in variations in image quality. The following table provides a general comparison, keeping in mind that actual performance can depend on factors like network conditions and webcam capabilities.
| Software | Typical Resolution Support | Typical Frame Rate | Compression Efficiency | Image Quality (Subjective) |
|---|---|---|---|---|
| Zoom | Up to 1080p | Up to 60 FPS (depending on settings and bandwidth) | Generally good | Good, often clear and sharp |
| Skype | Up to 720p | Typically 30 FPS | Moderate | Generally acceptable, can be slightly softer than Zoom |
| Google Meet | Up to 720p | Typically 30 FPS | Good | Comparable to Skype, often dependent on network conditions |
Improving Lighting and Environment

Good lighting and a clean background are crucial for a professional-looking webcam video. Poor lighting can result in a grainy, dark image, while a cluttered background distracts viewers from you and your message. This section will guide you through optimizing your lighting and environment for superior webcam quality.
Ideal Lighting Conditions for Webcam Performance
Optimal webcam performance requires even, bright illumination that minimizes harsh shadows and highlights. Avoid backlighting, where the light source is behind you, as this will result in a silhouetted image. Instead, aim for a light source positioned slightly in front and to the side of your face, creating a soft and flattering glow. The best lighting is soft, diffused light, mimicking natural, overcast daylight. This prevents harsh shadows and ensures your face is evenly lit.
Utilizing Different Lighting Techniques
Several lighting techniques can significantly enhance your webcam image quality.
Natural Light
Natural light is often the most flattering and readily available option. Position yourself near a window, ideally on a cloudy day, to avoid harsh shadows caused by direct sunlight. If using direct sunlight, consider using a sheer curtain or diffuser to soften the light. Imagine a bright, but not intensely bright, day – that’s the ideal natural light scenario. Avoid positioning yourself directly in front of a window; instead, sit at an angle to minimize harsh shadows and reflections.
Artificial Light
Artificial lighting offers more control, particularly in low-light situations. A softbox, a lighting modifier that diffuses light, is ideal for even illumination. Alternatively, a ring light, a circular light that surrounds your camera lens, provides soft, even light. Avoid using a single, bare bulb, as this can create harsh shadows and uneven lighting. If using multiple light sources, ensure they are balanced in terms of brightness and color temperature to avoid a disjointed appearance. A desk lamp with a soft white bulb, positioned to the side and slightly in front, can be a cost-effective alternative.
Impact of Background Clutter and Distractions
A cluttered or distracting background detracts from your webcam video. Viewers will focus on the chaos behind you rather than on you and what you’re saying. A busy background can also affect the overall image quality by introducing unwanted noise and interfering with the camera’s autofocus. Ensure your background is clean, simple, and uncluttered to maintain focus on you.
Choosing the Best Background for Professional Webcam Videos
The best background for professional webcam videos is simple, neutral, and uncluttered. A plain wall in a neutral color, such as light gray or beige, is ideal. Avoid backgrounds with strong patterns or bright colors, as these can be distracting. Ensure the background is well-lit, but not so bright that it overpowers you. A minimalist setup, perhaps with a single piece of art or a potted plant, can add personality without creating visual clutter. A bookshelf, for instance, can work well provided it’s organized and not overly packed with items. Remember, the goal is to create a professional and inviting atmosphere that complements your message, not compete with it.
Last Point

By systematically addressing hardware, software, and environmental factors, you can dramatically improve your webcam’s image quality. Remember, a clear picture translates to better communication and a more professional online presence. Following these five steps will equip you with the knowledge and skills to consistently capture high-quality video, regardless of your technical expertise. So, go ahead and upgrade your webcam experience today!