A whirring, buzzing, or grinding computer fan can be incredibly distracting, even irritating. The constant noise not only disrupts workflow but also raises concerns about potential hardware issues. Fortunately, many noisy fan problems are easily addressed with simple troubleshooting and maintenance. This guide provides five straightforward solutions to silence that annoying fan and ensure your computer runs smoothly and quietly.
From identifying the source of the noise and cleaning accumulated dust to lubricating bearings and, if necessary, replacing the fan, we’ll cover a range of techniques suitable for users of all technical skill levels. Understanding the underlying causes of fan noise empowers you to take preventative measures and maintain the longevity of your computer’s cooling system.
Identifying the Source of the Noise
A noisy computer fan can be incredibly frustrating, but pinpointing the cause is the first step to silencing it. Understanding the different sounds your fan might make and systematically investigating potential issues will help you resolve the problem efficiently. This section will guide you through identifying the source of the noise, from visual inspection to using system monitoring tools.
Computer fans produce a variety of noises, each potentially indicating a different problem. A high-pitched whine often points to bearing wear, while a clicking or ticking sound could suggest a loose fan blade or debris interference. A rumbling or rattling noise might indicate a resonance issue caused by the fan’s proximity to other components or loose screws. A sudden increase in fan speed and noise often correlates with overheating.
Visual Inspection of the Fan
Before resorting to software diagnostics, a thorough visual inspection is crucial. This involves carefully examining the fan for any visible signs of damage or debris buildup. This process should be undertaken with the computer powered off and unplugged from the mains to avoid any electrical shock.
To visually inspect the fan, you will first need to access it by opening your computer case (detailed instructions below). Once open, carefully examine the fan blades for any signs of damage, such as bending or cracks. Check for any accumulated dust or debris that may be hindering its rotation. Look closely at the fan’s motor housing for any loose screws or signs of physical damage. Finally, inspect the fan’s connection to the motherboard or power supply for any loose or damaged wires.
Using System Monitoring Software
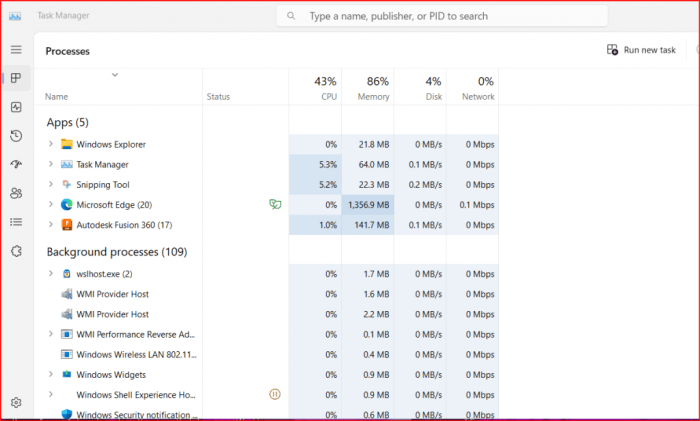
System monitoring software provides valuable insights into your computer’s hardware performance, including fan speed and temperatures. Popular options include HWMonitor, SpeedFan, and Core Temp. These programs display real-time data, allowing you to determine if the fan is spinning at the correct speed and whether the system is overheating. A fan running slower than expected or consistently high temperatures often indicate a problem.
After installing and launching your chosen software, observe the reported fan speed and CPU/GPU temperatures. Compare these readings to the manufacturer’s specifications for your computer’s components. If the fan speed is unusually low, or temperatures are significantly higher than normal under light load, it’s a strong indication that the fan is not functioning correctly or there’s another issue, like insufficient cooling paste, causing overheating.
Safely Opening a Computer Case
Opening your computer case requires care and attention to detail. Static electricity can damage sensitive components, so take appropriate precautions. Before you begin, ensure the computer is completely powered off and unplugged. Ground yourself by touching a grounded metal object, such as the metal casing of a plugged-in appliance (not the computer!).
| Problem | Cause | Solution | Image Description |
|---|---|---|---|
| High-pitched whine | Worn fan bearings | Replace the fan | An image showing a worn-out fan bearing with visible wear and tear on the metallic parts. Dust and debris are also visible around the bearing. |
| Clicking/Ticking | Loose fan blade or debris | Tighten loose screws or remove debris | An image showing a computer fan with one blade slightly bent or loose, with a small piece of dust visibly caught between the blades. |
| Rumbling/Rattling | Resonance or loose screws | Secure all screws and potentially add dampening material | An image depicting a computer fan that is rattling against the chassis; loose screws are clearly visible, and the fan appears to be vibrating excessively. |
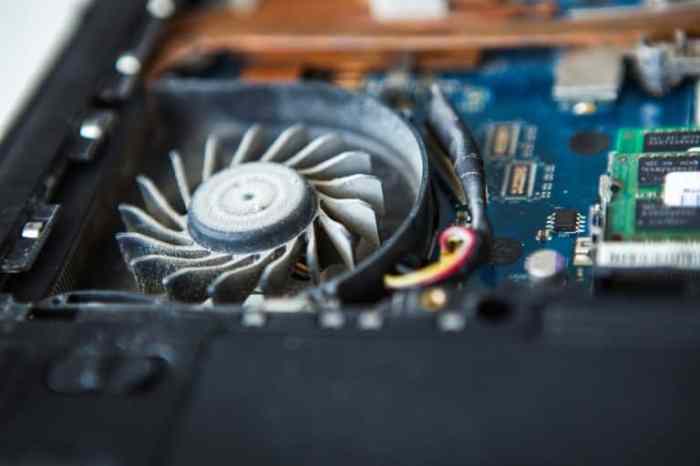
| Increased fan speed and noise | Overheating | Check for dust buildup, ensure proper airflow, reapply thermal paste | An image showing a computer case with excessive dust accumulation on the heatsink and fan, obstructing airflow. The image also shows high CPU temperature readings on a system monitoring software display. |
Cleaning and Lubrication Techniques

Keeping your computer fan clean and properly lubricated is crucial for its longevity and quiet operation. Dust accumulation restricts airflow, causing the fan to work harder and generate more noise. Lubrication ensures smooth bearing rotation, reducing friction and noise. This section details safe and effective methods for cleaning and, where appropriate, lubricating your computer fan.
Cleaning your computer fan involves removing accumulated dust from the fan blades and heatsink. There are several methods available, each with its own advantages and disadvantages. Improper cleaning can damage delicate components, so careful attention to detail is essential. Lubrication, if necessary and if your fan’s design permits, should be done sparingly and with the correct type of lubricant.
Methods for Cleaning Dust
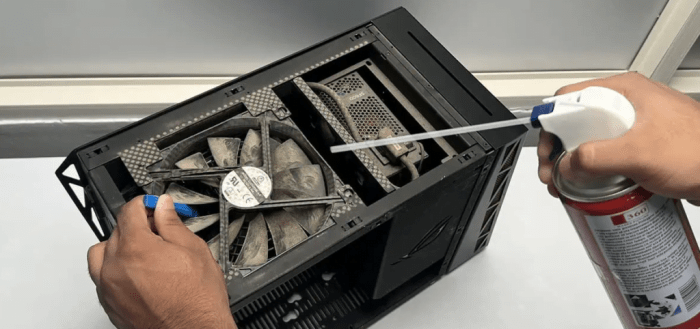
Effective cleaning requires removing dust from both the fan blades and the surrounding heatsink. Using compressed air is a common method, but a soft brush can also be effective for delicate components.
- Compressed Air: Compressed air cans effectively blast away dust from the fan blades and heatsink. However, excessive pressure can damage the fan motor or dislodge components. It’s important to hold the can at a safe distance and use short bursts of air. Ensure the can is upright to prevent propellant from being expelled with the air. After using compressed air, gently wipe away any remaining dust with a soft cloth. This method is particularly useful for reaching hard-to-access areas.
- Soft Brush: A soft-bristled brush, such as a small paintbrush or a dedicated electronics cleaning brush, provides a gentler approach to dust removal. This method is less likely to damage delicate components than compressed air, but it may not be as effective at removing deeply embedded dust. Gently brush the fan blades and heatsink in the direction of the blades’ rotation to avoid bending them. This method is ideal for cleaning areas where compressed air might be too forceful.
Compressed Air vs. Brush: A Comparison
Both compressed air and a soft brush are effective cleaning tools, but their application depends on the level of dust accumulation and the sensitivity of the components.
| Method | Pros | Cons |
|---|---|---|
| Compressed Air | Effective for removing large amounts of dust; reaches hard-to-access areas. | Can damage components if used improperly; may not remove all dust. |
| Soft Brush | Gentle on components; effective for delicate areas. | Less effective for removing deeply embedded dust; may be time-consuming. |
Safe Lubrication Techniques
Lubricating a computer fan bearing should only be attempted if the fan is designed for it (check the manufacturer’s specifications) and if you are comfortable performing the task. Using the wrong type of lubricant or applying too much can damage the fan. Only use lubricants specifically designed for small electronics.
- Identify the lubrication point: Most fans have a small hole or indentation near the bearing. This is where you’ll apply the lubricant.
- Apply a small amount: Use a very small amount of lubricant – a single drop is usually sufficient. Too much lubricant can attract more dust and damage the fan.
- Allow time for absorption: Let the lubricant settle into the bearing for a few minutes before testing the fan.
- Test the fan: Carefully test the fan to ensure it is running smoothly and quietly.
Computer Fan Cleaning Checklist
Proper safety precautions are paramount when cleaning your computer’s fan. Static electricity can damage sensitive components, and improper handling can lead to injury or further damage.
- Safety First: Ground yourself before starting by touching a grounded metal object.
- Power Down: Ensure the computer is completely powered off and unplugged from the power source.
- Choose your cleaning method: Select either compressed air or a soft brush based on the level of dust accumulation.
- Clean the fan: Carefully clean the fan blades and heatsink, using short bursts of compressed air or gentle brushing.
- Inspect for damage: Check for any damage to the fan blades or motor.
- Lubricate (if necessary and applicable): Apply a tiny amount of lubricant to the fan bearing if necessary and if the fan is designed for lubrication.
- Reassemble: Carefully reassemble the components.
- Test: Power on the computer and listen for any remaining noise.
Advanced Troubleshooting and Replacement
If basic cleaning and lubrication haven’t silenced your noisy computer fan, more advanced troubleshooting and potentially a replacement may be necessary. Understanding different fan types and their failure modes is crucial for effective diagnosis and repair.
Computer Fan Types and Failure Indicators
Computer fans primarily fall into two categories: axial and centrifugal. Axial fans, the most common type in PCs, move air parallel to the fan’s axis, creating a direct airflow. Centrifugal fans, less common in PCs, move air perpendicular to the axis, generating higher pressure but often at lower airflow rates. Identifying the type of fan in your system is helpful, although replacement is generally straightforward regardless of type. Common signs a fan needs replacing include unusual noises (high-pitched whining, clicking, grinding, or rumbling), noticeably reduced airflow (leading to overheating), and erratic or complete fan failure. If the fan is visibly damaged, such as having bent blades or a damaged motor, replacement is also necessary.
Choosing a Replacement Fan
Selecting a suitable replacement requires careful attention to specifications. The most critical parameters are size (usually expressed in dimensions like 80x80x25mm), airflow (measured in CFM – Cubic Feet per Minute), and voltage (typically 12V in PCs). Matching these specifications precisely is essential to ensure proper fit and functionality. Additionally, consider the bearing type (sleeve, ball, or fluid dynamic bearing) as this impacts lifespan and noise levels. Fluid dynamic bearings tend to be quieter and longer-lasting. Pay attention to the connector type (3-pin or 4-pin) to ensure compatibility with your motherboard. Finally, check the airflow direction; some fans are designed to exhaust air, while others are intake fans.
Safe Fan Replacement Procedure
Replacing a computer fan requires caution to prevent electrostatic discharge (ESD) damage to components. Always ground yourself before handling internal components. This can be achieved by touching a grounded metal object (like a grounded part of the computer case) before and during the process.
| Step | Action | Tools Needed | Potential Problems |
|---|---|---|---|
| 1 | Power down the computer and unplug the power cord. | Phillips head screwdriver | Accidental power-on. |
| 2 | Open the computer case. Ground yourself before touching internal components. | Grounding strap (optional but recommended) | ESD damage to components. |
| 3 | Disconnect the fan’s power connector from the motherboard. | None | Difficulty disconnecting the connector. |
| 4 | Remove the screws securing the fan to the case or heatsink. | Phillips head screwdriver | Stripped screws. |
| 5 | Carefully remove the old fan. | None | Damage to surrounding components. |
| 6 | Install the new fan, ensuring proper orientation and secure attachment. | Phillips head screwdriver | Incorrect orientation of the fan. |
| 7 | Reconnect the fan’s power connector to the motherboard. | None | Incorrect connector placement. |
| 8 | Close the computer case. | None | Difficulty closing the case. |
| 9 | Power on the computer and check if the fan is working correctly and quietly. | None | Fan failure or incorrect installation. |
Ultimate Conclusion
Addressing a noisy computer fan is often simpler than you might think. By systematically investigating the potential causes – from debris buildup to bearing wear – and applying the appropriate solutions, you can restore peace and quiet to your workspace. Regular maintenance, including cleaning and occasional lubrication, can prevent future noise problems and ensure your computer remains cool and efficient for years to come. Remember, a quiet computer is a happy computer!