A dead motorcycle battery can leave you stranded, but quick diagnosis and action can often get you back on the road in minutes. This guide tackles eight common motorcycle battery problems, providing clear, step-by-step solutions to get your bike running again swiftly. We’ll cover everything from identifying symptoms and troubleshooting issues to recharging your battery and choosing the right replacement.
From understanding the subtle signs of a failing battery to mastering the art of jump-starting and preventative maintenance, this guide offers practical, actionable advice. Whether you’re a seasoned rider or a novice, learning to diagnose and resolve battery issues is an essential skill for any motorcyclist. We’ll equip you with the knowledge and confidence to handle most battery-related problems efficiently and safely.
Identifying Dead Battery Symptoms in Motorcycles
A dead motorcycle battery can leave you stranded, so recognizing the signs is crucial. Understanding the symptoms, from subtle hints to complete failure, will help you diagnose and address the problem quickly, preventing inconvenient breakdowns. This section details common symptoms and explains how to differentiate between a fully discharged and partially depleted battery.
Several situations can lead to a dead motorcycle battery. Leaving your motorcycle’s lights on, even for a short period, is a common culprit. Extended periods of non-use, particularly in cold weather, can also drain the battery significantly. Faulty charging systems within the motorcycle itself, or accessories drawing excessive power, can also contribute to a dead or rapidly depleting battery.
Dead Battery Symptoms
Recognizing the symptoms of a failing motorcycle battery is vital for preventing roadside emergencies. The symptoms can range from subtle indications to complete power failure. Early detection can save you time and potential frustration.
- Slow Engine Cranking: The engine turns over slowly or struggles to start. This is often an early warning sign of a weakening battery.
- Dim Headlights: Noticeably dimmer headlights or other lights indicate a low battery charge.
- Clicking Sound During Startup: A rapid clicking sound when you turn the ignition key suggests the battery lacks sufficient power to engage the starter motor.
- Electrical System Malfunctions: Issues with other electrical components, such as turn signals, horn, or instrument panel lights, may point to a low battery voltage.
- Complete Power Failure: The motorcycle’s electrical system fails entirely, preventing the engine from cranking or any electrical components from functioning. This indicates a completely dead battery.
Differentiating Between Completely Dead and Partially Discharged Batteries
The difference between a completely dead and a partially discharged battery lies in the level of power remaining. Understanding this distinction is key to choosing the appropriate course of action.
- Completely Dead Battery: No electrical power is available. The motorcycle won’t even attempt to start; there’s no cranking, clicking, or light activation. A completely dead battery requires charging or replacement.
- Partially Discharged Battery: The battery has some charge remaining, but not enough to start the engine reliably. You might experience slow cranking, dim lights, or other symptoms mentioned previously. A partially discharged battery can often be jump-started or charged.
Diagnosing Battery Problems: A Flowchart
This flowchart helps you systematically diagnose motorcycle battery issues based on observed symptoms. Follow the steps to determine the problem’s severity and the appropriate solution.
| Symptom | Possible Cause | Action | Next Step |
|---|---|---|---|
| Slow Cranking | Low Battery Charge | Attempt to jump-start | If successful, charge battery. If unsuccessful, proceed to next step. |
| Clicking Sound | Very Low Battery Charge | Attempt to jump-start | If unsuccessful, battery likely needs replacement. |
| Dim Lights | Low Battery Charge | Check battery voltage | If voltage is low, charge the battery. If voltage is normal, check charging system. |
| Complete Power Failure | Dead Battery | Check battery voltage | If voltage is extremely low or zero, replace the battery. |
Troubleshooting Common Motorcycle Battery Issues

A dead motorcycle battery can leave you stranded, so understanding the common causes and troubleshooting steps is crucial for maintaining your bike’s reliability. This section will guide you through identifying the root of the problem and implementing effective solutions. We’ll cover several common issues, from simple fixes like cleaning terminals to more involved checks of the charging system.
Causes of a Dead Motorcycle Battery
Several factors can contribute to a motorcycle battery’s demise. These include age, where the battery’s internal components simply degrade over time, reducing its capacity to hold a charge. A faulty charging system, often the stator or voltage regulator, prevents the battery from receiving the necessary power to replenish itself after use. Finally, a parasitic drain occurs when components continue drawing power even when the ignition is off, slowly depleting the battery’s charge. This drain is often caused by faulty accessories, wiring issues, or malfunctioning electrical components. Identifying the source of the problem is key to preventing future occurrences.
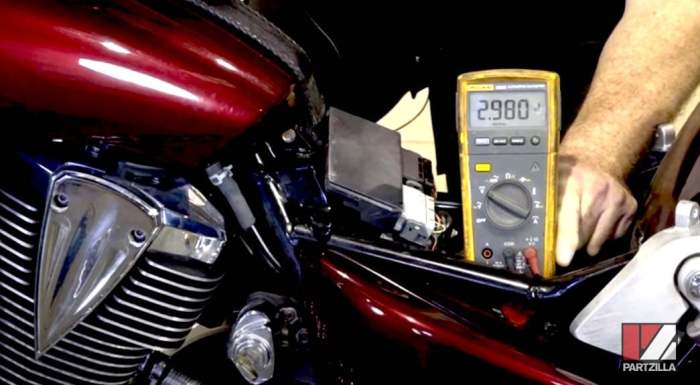
Checking Battery Voltage with a Multimeter
A multimeter is an essential tool for diagnosing battery problems. To check the battery voltage, first, ensure the motorcycle is turned off. Then, set your multimeter to the DC voltage setting (usually represented by a symbol showing a direct current). Connect the red lead of the multimeter to the positive (+) terminal of the battery and the black lead to the negative (-) terminal. The multimeter will display the voltage reading. A fully charged 12-volt battery should show a reading between 12.6 and 13.2 volts. A reading below 12.2 volts indicates a low charge, while a reading significantly lower than that suggests a more serious problem. A reading above 13.2 volts might suggest an overcharging issue, possibly due to a faulty regulator.
Imagine a digital multimeter display showing “12.8V”. This indicates a healthy battery with a good charge. Conversely, a display showing “11.5V” would suggest a low charge, warranting further investigation and potentially charging the battery. A reading of “10V” or lower is a strong indication of a significantly discharged or faulty battery.
Jump-Starting a Motorcycle Battery
Jump-starting a motorcycle battery requires caution to prevent damage to the electrical system. Two primary methods exist: using jumper cables directly from another vehicle’s battery or using a portable jump starter. When using jumper cables, ensure the positive (+) and negative (-) terminals are correctly connected, avoiding any accidental short circuits. Always connect the positive clamps first, followed by the negative clamps, and disconnect in reverse order. Using a portable jump starter simplifies the process, often providing clearer instructions and better safety features. This method eliminates the need for another vehicle and offers a more controlled jump-starting experience. Regardless of the method, be mindful of potential sparks and maintain proper safety precautions.
Cleaning Motorcycle Battery Terminals and Connections
Dirty or corroded battery terminals can significantly impede electrical conductivity, leading to a weak charge or complete failure. Cleaning these terminals is a simple yet effective preventative measure.
- Disconnect the battery’s negative (-) terminal first, followed by the positive (+) terminal.
- Use a wire brush or battery terminal cleaner to remove corrosion from both terminals and the cable ends.
- Apply a battery terminal protector or grease to prevent future corrosion.
- Reconnect the positive (+) terminal first, followed by the negative (-) terminal.
This simple cleaning process can dramatically improve the battery’s performance and prevent future issues. Remember to always disconnect the negative terminal first to avoid accidental short circuits.
Recharging and Replacing a Motorcycle Battery

A dead motorcycle battery can leave you stranded, so understanding how to properly recharge and replace it is crucial for any rider. This section details the process of safely charging your battery, selecting the correct replacement, and implementing preventative maintenance to maximize its lifespan. Ignoring these steps can lead to premature battery failure and costly repairs.
Trickle Charging a Motorcycle Battery
Connecting a trickle charger is straightforward but requires attention to detail to avoid damage. First, ensure your motorcycle is turned off and the ignition key is removed. Locate your battery; it’s usually under the seat or side cover. Clean the battery terminals with a wire brush to remove corrosion. This improves the connection and prevents voltage loss. Now, connect the charger’s clamps to the battery terminals. The red clamp goes to the positive (+) terminal (usually marked with a “+” symbol or red color), and the black clamp goes to the negative (-) terminal. Refer to your charger’s instructions for specific connection details. Once connected, turn on the charger and monitor the charging process. Most trickle chargers have indicators showing the charging status. Allow the battery to charge fully according to the charger’s instructions; this may take several hours or even overnight. Never leave a trickle charger unattended for extended periods without monitoring. After charging, disconnect the clamps in reverse order (negative first).
Selecting the Right Replacement Battery
Choosing the correct replacement battery is vital for optimal performance and safety. The wrong battery can lead to poor starting, premature failure, and even damage to your motorcycle’s electrical system. Always refer to your motorcycle’s owner’s manual for the recommended battery type, size, and specifications (such as CCA – Cold Cranking Amps). These specifications ensure compatibility and optimal performance. Consider factors like battery type (AGM, flooded), size (physical dimensions), and CCA rating. Higher CCA ratings are better for quicker starts, especially in cold weather.
Battery Type Comparison
The following table compares common motorcycle battery types:
| Battery Type | Advantages | Disadvantages | Typical Applications |
|---|---|---|---|
| Flooded Lead-Acid (FLA) | Generally less expensive | Requires regular maintenance (topping off with distilled water), more prone to spillage and damage from vibration | Older motorcycles, budget-conscious riders |
| Absorbent Glass Mat (AGM) | Maintenance-free, spill-proof, vibration-resistant, longer lifespan | More expensive than FLA | Modern motorcycles, demanding applications |
| Gel Cell | Maintenance-free, spill-proof, vibration-resistant, excellent deep-cycle capability | Most expensive, lower CCA compared to AGM for same size | Specialized applications requiring deep discharge cycles |
Preventative Maintenance for Motorcycle Batteries
Regular maintenance significantly extends a motorcycle battery’s lifespan. Clean the battery terminals periodically with a wire brush and baking soda solution to remove corrosion. Ensure proper ventilation around the battery to prevent overheating. Avoid leaving your motorcycle unused for extended periods; a trickle charger can help maintain the charge. Periodically check the electrolyte level (for flooded batteries only) and add distilled water if necessary. Avoid overcharging, as this can damage the battery.
Implications of Using the Wrong Battery Charger
Using the incorrect charger can damage your battery or even cause a fire. A charger with too high a voltage can overheat and damage the battery cells. Conversely, a charger with insufficient amperage may take too long to charge the battery or not charge it fully. Always use a charger specifically designed for the type and size of your motorcycle battery. Follow the manufacturer’s instructions carefully. Never attempt to “fast charge” a motorcycle battery unless the charger specifically allows it. Using an inappropriate charger can void the battery’s warranty and may lead to costly replacements.
Conclusion
Successfully resolving a dead motorcycle battery often comes down to understanding the underlying cause. By systematically checking voltage, cleaning terminals, and employing proper charging techniques, you can significantly reduce downtime and extend the life of your battery. Remember, preventative maintenance, like regularly checking your battery’s condition and ensuring a healthy charging system, is key to preventing future issues. With the knowledge gained here, you’ll be prepared to tackle most battery problems with confidence and efficiency, keeping your riding adventures uninterrupted.